| Author |
 Topic Topic  |
|
B112
USA
5257 Posts |
 Posted - 06/07/2009 : 21:21:41 Posted - 06/07/2009 : 21:21:41


|
quote:
If the tanks were epoxy coated the salt water could not get to the metal.
Yes, after researching many tanks are now being epoxy coated. My friend who's repairing/replacing his tanks had already planned to use "AwlGrip 30-Y-94 Epoxy Primer" which is designed for aluminum and the maker recommends sand blasting. He's going to test the strength and review a cross section of the HTS-2000 this week.
Here's a wood template we've cut from the cardboard template I made to fit where the old bulkhead was. I'm not reviewing this template to make sure it fits exactly before making a plastic replacement.
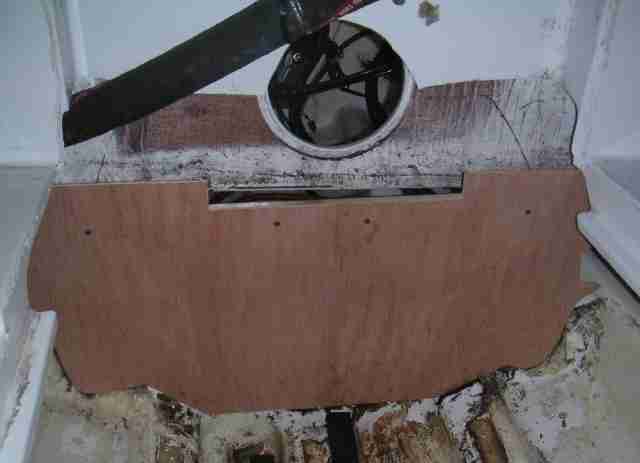
Also, still checking on tank bids still. One thing which was advised is that these tanks have inner baffles to reduce the weight of the fuel slamming on the other side of the tank and using an experienced tank builder verses a welder was recommended. I'm going to put a mirror in my tank to see what the inside really looks like.
|

Michael |
 |
|
|
B112
USA
5257 Posts |
 Posted - 06/07/2009 : 22:06:47 Posted - 06/07/2009 : 22:06:47


|
| Yes, there are baffles in the tank. I just went outside to use an inspection mirror to look deep into the tank. |

Michael |
 |
|
|
Leroy
USA
413 Posts |
 Posted - 06/08/2009 : 23:14:58 Posted - 06/08/2009 : 23:14:58


|
quote:
Originally posted by B112
Yes, there are baffles in the tank. I just went outside to use an inspection mirror to look deep into the tank.
That is wise. I would expect you could see the welds from the outside. |
 |
|
|
B112
USA
5257 Posts |
 Posted - 06/14/2009 : 16:17:51 Posted - 06/14/2009 : 16:17:51


|
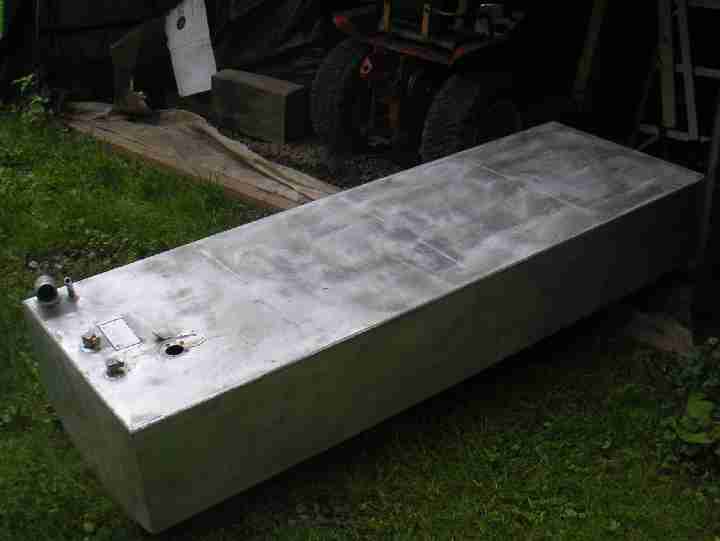
Well after getting competitive bids, I choose a vendor to make me a new tank. For the one little spot, it's sad... but feels better. Besides, I can sell the old tank and get some decent cash for it. I had to at least strip the old tank to see what was under the paint and gunk. Glad I did.
This the old tank I spent the time to strip and inspect:(Yes, that's a Simplicity 990350 in the background.  ) )
Here's the sketch I'm sending the the vendor tomorrow: (This took 4 hours to make and three double checks on all numbers.)
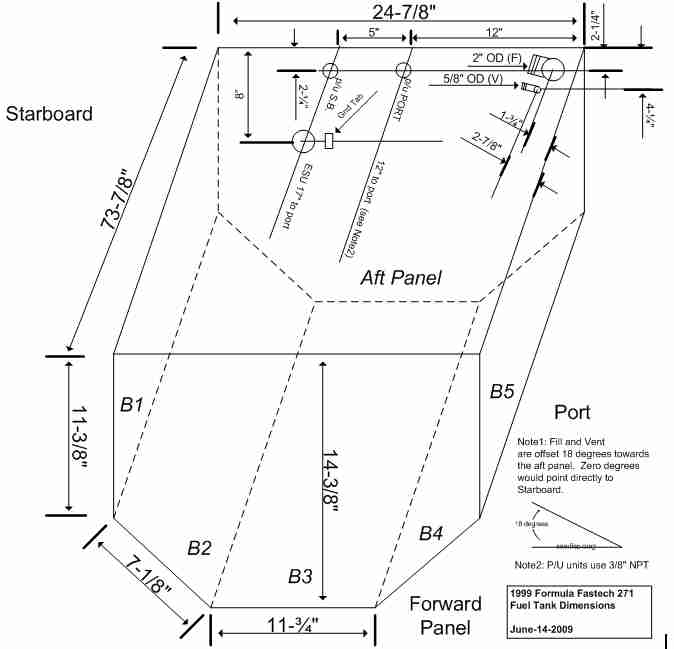
(Thunderbird 1999 Formula Fastech 271 Gas Tank Dimensions)
Think I'll experiment with the brazing rod with some trailer/tractor project.
|

Michael |
 |
|
|
Leroy
USA
413 Posts |
 Posted - 06/14/2009 : 23:27:03 Posted - 06/14/2009 : 23:27:03


|
Michael; It may not be too late to add the baffles at about 18 3/8" spacing.
Detailing those may be a problem.
How i believe they are installed is like a paper cut out that fit through slots in the tank, those are then welded.
I may be wrong.
That detail will add to the cost in prep work prior to bending.
If the company has a laser cutting tool for the material it will be perfect.
The holes you have indicated may require a threaded boss on the inside of the tank. I am pretty sure I see a weld bead around a couple of those ports. The drawing should have those details if the vendor will be held to it. |
Edited by - Leroy on 06/15/2009 00:46:19 |
 |
|
|
B112
USA
5257 Posts |
 Posted - 06/15/2009 : 07:18:49 Posted - 06/15/2009 : 07:18:49


|
Leroy- This is a "duh" back to me... Look at this picture:
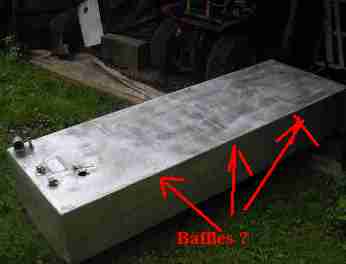
I am betting those marks in the picture are the baffles of the original tank. As for the tank maker putting in the baffles, I'll be confirming that today and sending that photo above. The sketch above is what the tank vendor requested minus baffles; I believe they know how many and where they need to be.
I actually went with SP Tank out of Toms River, NJ whom gave me the best quote AND seemed extremely qualified. After having other vendors give out of the ball park quotes and not get the quotes right the first time (i.e. not reading the spec), I felt this one was the best. They have excellent information on their website and took the time to verbally explain their product. So we'll see what we get in a week or two.
The challenge next will be to determine the best way to install the tank. The latest technology and positions on installation differ and conflict from the OEM design. Most (not all) are saying DON'T FOAM in marine gas tanks. |

Michael |
 |
|
|
B112
USA
5257 Posts |
 Posted - 06/15/2009 : 12:59:22 Posted - 06/15/2009 : 12:59:22


|
| Ok, I have my order and per the vendor, they include baffles per coast guard requirements and pressure test to 5PSI. The old tank was 4psi. I still have the installation conflict; I may need to lean towards installing per the tank manufacturers installation procedure to take advantage of their warrentee. Which say's NO FOAM. |

Michael |
 |
|
|
Leroy
USA
413 Posts |
 Posted - 06/15/2009 : 13:22:41 Posted - 06/15/2009 : 13:22:41


|
quote:
Originally posted by B112
Leroy- This is a "duh" back to me... Look at this picture:

I am betting those marks in the picture are the baffles of the original tank. As for the tank maker putting in the baffles, I'll be confirming that today and sending that photo above. The sketch above is what the tank vendor requested minus baffles; I believe they know how many and where they need to be.
I actually went with SP Tank out of Toms River, NJ whom gave me the best quote AND seemed extremely qualified. After having other vendors give out of the ball park quotes and not get the quotes right the first time (i.e. not reading the spec), I felt this one was the best. They have excellent information on their website and took the time to verbally explain their product. So we'll see what we get in a week or two.
The challenge next will be to determine the best way to install the tank. The latest technology and positions on installation differ and conflict from the OEM design. Most (not all) are saying DON'T FOAM in marine gas tanks.
If you want assurance that the tank will stay put, ask them too weld straps across the top that extend over the edge so you can put turn buckles on them.
I would place these centerd direct over the baffles. So 6 turn-buckles in all, with a rubber nest for the tank.
Maybe you can't get a turn buckle in there.
There are mechanically advantaged hold downs that can surface mount and make use of the top strap, in place of the foamed in approach. |
Edited by - Leroy on 06/17/2009 12:17:53 |
 |
|
|
Leroy
USA
413 Posts |
 Posted - 06/27/2009 : 16:36:05 Posted - 06/27/2009 : 16:36:05


|
| Michael did they get er done on your tank? |
 |
|
|
B112
USA
5257 Posts |
 Posted - 06/28/2009 : 00:21:59 Posted - 06/28/2009 : 00:21:59


|
| I called them and I'm picking it up next week. |

Michael |
 |
|
|
B112
USA
5257 Posts |
 Posted - 07/05/2009 : 21:54:20 Posted - 07/05/2009 : 21:54:20


|
Update: I have my new tank and it came back perfect except for one dimension which I didn't specify, but I provided in a photograph. Note that the documents(the sketch above) they request I had listed every dimension and spent 5 hours verifying all the dimensions. The fill and vent tubes are parrellel to the tank verses my tubes come down at 45
degrees. I asked if they had any questions with my photo/sketch and they said no. Well got the tank back and instead of them questioning wether the fill tube should hang over the back of the tank, they just did that. I'll be calling them tomorrow to see if they will fix it if needed, understanding I am going to try to make it work.
Update2: My boat engine was dyno tested today and generated 25hp more on a carb than when it went in for the rebuild (prior dyno test on carb). Next I'm installing the electronic ignition and painting/assembling the engine. Still have trim tabs (hydrolines & gelcoat work), tank installation, bilge pumps, exhaust corrections, general assembly and seats to go. |

Michael |
 |
|
|
B112
USA
5257 Posts |
 Posted - 07/12/2009 : 05:49:01 Posted - 07/12/2009 : 05:49:01


|
Now I need to figure out a way to strap this tank back into the boat. The original straps shown broke. With the tank out, I could secure straps where the old ones were and mate those on the top of the tank. I'd need somethings which will not hurt the tank.
Here's how the old tank looked in the boat:
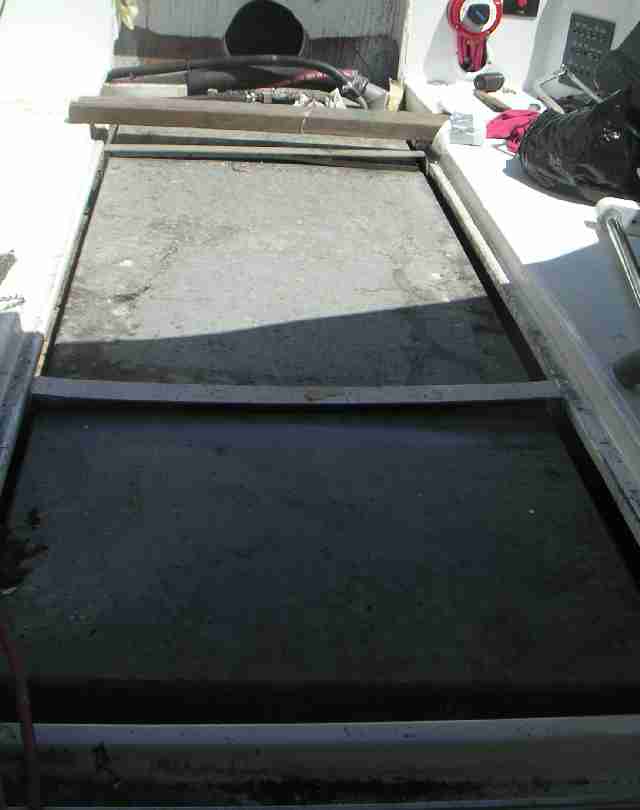
I'm thinking of an idea sort of like how the Simplicity gas tanks pull the wrapping strap together. What ever I use must not rust, so I can't use plain steel.
Here's a closeup of a strap and the space between the deck:
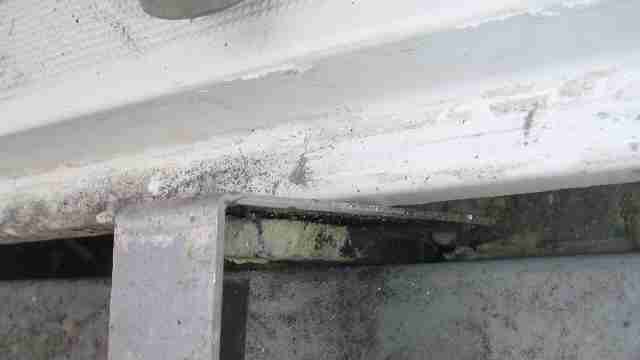
Any ideas?
|

Michael |
 |
|
|
Leroy
USA
413 Posts |
|
|
B112
USA
5257 Posts |
 Posted - 08/01/2009 : 07:40:51 Posted - 08/01/2009 : 07:40:51


|
Unfortunately, those were not made for a 145lb tank holding 600lbs roughly of fuel. My original straps broke at the bends. So I'm thinking of making something like this:
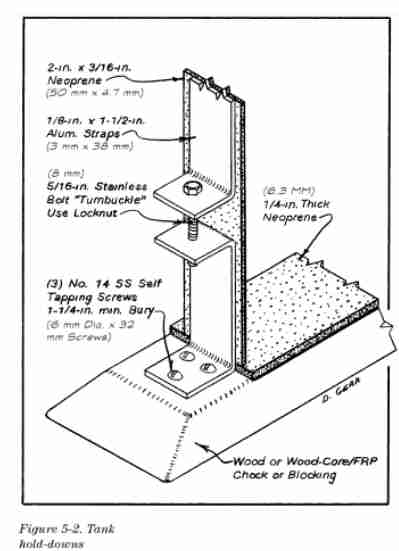
Except the top hold down would be only a straight bar. Now I may make this from 1/4" aluminum verses the 3/16 aluminum which broke. The side brackets would go to the top of the tank instead of half way as shown and the top bracket being straight would either be straight or have that same bend but shallow. I'd reenforce the bends with triangle braces so I don't break at the welds. |

Michael |
 |
|
|
Leroy
USA
413 Posts |
 Posted - 08/01/2009 : 14:36:55 Posted - 08/01/2009 : 14:36:55


|
I would not use a self taping wood screw.
I didn't see where you had blocks to put screws into.
On the block of wood hold down, I would use SS T nuts and lock tight on the screws.
http://www.jamestowndistributors.com/userportal/show_product.do?pid=1746#MyReviewHeader.
My idea would be to epoxy truck ratchet straps to the entire underside of the tank hold.
Then using a simular bracket attachment with beefy screws because they will bend, on the ends on those straps to bring tension to the top of the tank. 4 straps epoxied and overlaped on to the top of the tank. I will try and hand draw wat i am talking about and and share it, later.
|
 |
|
 Topic Topic  |
|

